Most recently, I finished reading one of the spring book club selections, "Sanctuary" by Terry Hershey. My review is posted here. Check out the roundtable on this book (and others!) at the Patheos Book Club.

A place for things that make me say "YAY"!
Friday, April 24, 2015
A Piece of Peace
A while back I heard about a website that was looking for book reviewers and offered to join their roundtables and do some reading. The first book they sent me was a pre-release copy of “Vulnerable Faith” by Jamie Arpin-Ricci. My review is here. (SPOILER ALERT: I really liked it!)

Thursday, January 30, 2014
A Little Freedom
Facebook Freedom. I had thought (very passively) from time to time about getting off of Facebook. I knew I was spending wasting too much time scrolling through my feed and more over I was too often left feeling bad in one way or another after going there. Either because of the content or just the fact that I had once again distracted myself and misused time that would be better spent elsewhere. It was becoming one of those things where I knew I could and should do better but it was easier not to. I never really allowed myself to think about it though.
Then I found out a friend of mine had deleted her account and I really did think about it - at least a bit. Was I afraid of something? Was I afraid I'd miss something? I'm not quite sure what the resistance was but I decided that I could at least try living without Facebook. Perhaps the fact that it required such thought meant it was time to step away anyhow? So after a few days of deciding I would deactivate my account (and not doing it) I began deleting pictures and content from my account. For some reason I needed to make it into a project, but bottom line, I did it. Now who knows whether anything was actually deleted or deactivated but I got my time back. And the weird thing is...I don't care. I haven't really had to get used to it or make any transition I just don't use Facebook any more. So - Yay for Mommy!
Then I found out a friend of mine had deleted her account and I really did think about it - at least a bit. Was I afraid of something? Was I afraid I'd miss something? I'm not quite sure what the resistance was but I decided that I could at least try living without Facebook. Perhaps the fact that it required such thought meant it was time to step away anyhow? So after a few days of deciding I would deactivate my account (and not doing it) I began deleting pictures and content from my account. For some reason I needed to make it into a project, but bottom line, I did it. Now who knows whether anything was actually deleted or deactivated but I got my time back. And the weird thing is...I don't care. I haven't really had to get used to it or make any transition I just don't use Facebook any more. So - Yay for Mommy!
Saturday, January 4, 2014
8 Words For The New Year

Someone already wrote my motto for the year for me! Thanks!
SIMPLIFY I had the word simplify in my head already as a better way to categorize decluttering. Decluttering sounds like a problem to fight and something that hangs over you until it's completed...and really, when will I ever be truly free of clutter? Simplying, though, sounds sort of zen. It sounds like something that can be found within the uncluttered messes for a feeling of peace amid chaos. It's a mindset not an overwhelming to-do list of decisions and garbage collection. It also speaks to me about perfectionism. Letting go of expectations and just simply doing and being. I like it.
BE INSPIRED I've hesitated to make great declarations about blogging, sewing, creating, selling or anything that feels like a mandate to myself. I really believe I need to start small with something I do just because I want to do it. If I'm inspired the momentum can carry me to bigger places. Focusing on the big place seems, well, big.
BE ORIGINAL As I look through blogs, Pinterest and other people's work I think "I can do that!". Yet I don't. Besides the fact that what I'm seeing has already been done, I think I'm trying to back into what I can do rather than what I want to do. Defining success as doing what I want to do the way I want to do it is authentic. And original.
WORK HARD As a stand alone, this one feels a bit harsh to me - working harder is not always better. When I'm struggling and should be gentler on myself and those around me "work harder" can bully it's way in to save the day when really, it just compounds the problem. In context of this list, however, I think it fits. I'm not afraid of hard work - it brings a sense of accomplishment and self-worth. Rest and play are essential for balance but need to be balanced against work.
ENJOY None of the other things mean much without taking time to enjoy. Enjoy the calm of simplicity. Enjoy the creative process. Enjoy being original and true to myself. Enjoy the satisfaction of a job well done. Enjoy the doing and the not doing. Enjoy what's done and what's left to do. This one, for me, is to capture mindfulness and being in the moment. A reminder that I can chose joy. To live in joy and ENjoy.
Wednesday, April 6, 2011
Charmed, I'm Sure
Once it was brought to my attention that there are PRINTABLE (like ink jet printer printable) Shrinky Dinks I knew my sewing projects had some competition for my attention. I tested out a version of this project and it came out so-so but mostly because my printer was running out of ink and everything was kind of orange! Then as I thought and thought and pondered the possibilities, an idea for a birthday present for a Shrinky-Dink and wine loving friend took shape. Here's my tute followed by the rocky road I took to get to the finished product...now that I know what to do (and what NOT to do) it's a neat and easy craft.
First off you of course need supplies:
- Printable Shrinky-Dink plastic (I got mine at Hobby Lobby)
- An ink jet printer (not laser ie heat printing)
- Image files
- Software to lighten the images
- A hole punch
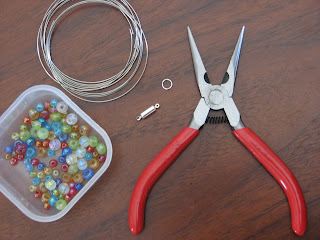
- Jewelry wire
- Jump rings
- Pretty beads
- Magnetic closures (optional)
- Patience (not optional)
To start you'll need to prep your image files to be printer-Shrinky-Dink-ready. You'll want to estimate the final piece(s) to be about 30% of your starting size. I printed pictures sized so I could cut pieces that were 2.5 inches round and they shrunk to about the size of a dime. Your image files need to be lightened quite significantly as well because when they heat and shrink they darken. This was a bit of trial and error for me especially since I had a range of pictures and colors/darknesses. In the example below you can see the second image looks very washed out - I'd make it even lighter if I were to print and shrink it again. Don't be afraid of the light(ness)!

The Shrinky-Dink package has directions for lightening - about 50% should work. You can make transparent in Photoshop or I found www.splashup.com to be a nifty option as well.
Once you have your files set, be sure to print a test sheet on regular paper in case you see something isn't how you're expecting it. I get a little impatient with the prep work myself but that just leads to rework. I cut my printed image on my Cricut but you could of course do it by hand or use another type of cutting machine. I'll put the settings details at the end of this post for anyone who is interested. NOTE that I cut a 'charm' shape that included a little top 'loop'. That allowed me to attach the finished piece. If you cut by hand you'll need to punch a hole (regular paper punch is fine) BEFORE you bake or you'll end up with a disk and no hole for your wires!
 Now for the FUN part! The oven! Shrinky Dinks are fairly forgiving within the 290-300 degree range but again, a test run is advisable. I find 295F works well for me, but read the package instructions. I use parchment paper under the shrinky plastic piece but brown paper bag paper works fine too. It sure is fun to watch the magic as they curl up and recover so nicely! I heated each of the six I made individually so when they came out of the oven I could press each under a tile to make sure it was completely flat (they cool super-fast so you don't have enough time to press a bunch)

And here's what I got:
 Once your nifty little pieces are cooled they need to be sealed. I tried both ModPodge and clear nail polish (spray acrylic is another option). Here's another place you may want to do a test run to decide what you prefer. I think the nail polish brought out the colors better and didn't leave brush marks so...I love ya Mod but I'll save you for a later step!
Next up - building the charms. I attached a small jump ring to each of the charms. Then I cut pieces of stiff wire (about 3 inches depending on how large you want your charm to be) and bent them into a ring. I bent one end of the wire into a small loop, hooked on one end of the magnetic clasp and tightened the wire around the clasp end. Next I strung on a small bead, two larger beads, the charm, two large beads and a small bead. Of course you can design yours however you please. To finish it off I bent the other end of the wire and hooked on the other end of the magnetic clasp. Make sure everything is bent together nice and snug and you've made yourself (or a friend) a cool charm!
 To finish my gift in style I made up some little cards to attach the charms to that also brought the 'theme' together. Welcome back Mod Podge thanks for your help!
 And here are some examples of the finished product...


First off you of course need supplies:
- Printable Shrinky-Dink plastic (I got mine at Hobby Lobby)
- An ink jet printer (not laser ie heat printing)
- Image files
- Software to lighten the images
- A hole punch
- Jewelry wire
- Jump rings
- Pretty beads
- Magnetic closures (optional)
- Patience (not optional)
To start you'll need to prep your image files to be printer-Shrinky-Dink-ready. You'll want to estimate the final piece(s) to be about 30% of your starting size. I printed pictures sized so I could cut pieces that were 2.5 inches round and they shrunk to about the size of a dime. Your image files need to be lightened quite significantly as well because when they heat and shrink they darken. This was a bit of trial and error for me especially since I had a range of pictures and colors/darknesses. In the example below you can see the second image looks very washed out - I'd make it even lighter if I were to print and shrink it again. Don't be afraid of the light(ness)!

The Shrinky-Dink package has directions for lightening - about 50% should work. You can make transparent in Photoshop or I found www.splashup.com to be a nifty option as well.
Once you have your files set, be sure to print a test sheet on regular paper in case you see something isn't how you're expecting it. I get a little impatient with the prep work myself but that just leads to rework. I cut my printed image on my Cricut but you could of course do it by hand or use another type of cutting machine. I'll put the settings details at the end of this post for anyone who is interested. NOTE that I cut a 'charm' shape that included a little top 'loop'. That allowed me to attach the finished piece. If you cut by hand you'll need to punch a hole (regular paper punch is fine) BEFORE you bake or you'll end up with a disk and no hole for your wires!


And here's what I got:

Next up - building the charms. I attached a small jump ring to each of the charms. Then I cut pieces of stiff wire (about 3 inches depending on how large you want your charm to be) and bent them into a ring. I bent one end of the wire into a small loop, hooked on one end of the magnetic clasp and tightened the wire around the clasp end. Next I strung on a small bead, two larger beads, the charm, two large beads and a small bead. Of course you can design yours however you please. To finish it off I bent the other end of the wire and hooked on the other end of the magnetic clasp. Make sure everything is bent together nice and snug and you've made yourself (or a friend) a cool charm!


Cute eh? Despite my occasional FAIL as I worked through the details it was really fun to make these. A set for Mother's Day with "All-Time Best Moms" might be cute - June Cleaver (of course), Mrs Cunningham, Shirley Partridge, Carol Brady and of course your own Mom!
So my lessons learned are as follows:
- Test and retest the images on regular paper before printing on the plastic. It's too expensive to waste as much as I did! ;-)
- Test your shape and size so you know how much shrinkage there will be, my first charms were too big.
- Decide on and practice your cutting method and shape. The Cricut is a GREAT option but I had to work on blade placement to get the images properly positioned.
- If you don't know anything about jewelry making ask someone who does what wire to use (and make sure your beads will fit on your selection). I used memory wire which was a good stiffness and size but hard to shape.
- If you don't want to use the magnetic clasps just bend the wire ends into hook shapes that can link to each other.
Have fun, be creative - Shrinky Dinks ROCK!
Cricut Settings:
- Doodlecharms Cartidge
- Charm round
- 2.5 inches
- Low/Med speed
- High Pressure
- Center (be sure you determine the center WITH the charm top loop in mind)
- Multi cut (two times through worked fine)
Email me if you have any questions! Please send a picture if you try this or something similar yourself!
Friday, February 25, 2011
Arrgh Maties!
The pirate (room) adventures continue. We've been doing bits and pieces for months (well we've also been doing nothing to the room for stretches too!) and are pretty close to calling it 'done' - then again when is anything every really "done" in a house? Here is some photographic proof that we have indeed (sorta) finished a pirate room!
We started with a wave pattern - darker 'water' below and 'sky' above then added an island and pirates...

The island wraps around the corner wall a bit...

Here's the back wall...

A wooden piratey name thing I made...

...and the 'phew! I finally finished it' addition ...the closet curtains. We took off the doors when we first made what was my office into the nursery. I was able to match fabric to the wall colors fairly well so now the water/sky design follows through the room.

I still need to do something to fix up the dresser because when it was a changing table, the changing pad scratched the heck out of the top. I also need to do something about the window curtain. I made what is supposed to be a big sail/mast as a curtain but I have to add a way to 'open' it in the daytime (right now it just gets flipped over the rod to let in what sun there is in February! I'll update when there's new news!
Tuesday, February 15, 2011
(Foam) Heart Attack!
Trying to channel my inner Martha Stewart, I whipped up a batch of cupcake batter. OK OK, it was a boxed mix (Martha FAIL!) BUT I made the butter cream frosting from scratch (Martha WIN!) My first round was an attempt at heart shaped mini-cupcakes. I put little wedges of tin foil in the side of each to make a heart-ish shape. Well Martha FAIL! on that because I filled the cups too high and they baked up over the edges and most of them looked round. I ditched that idea and baked a 'normal' pan of 24 mini-cupcakes and ended up back in the WIN! column. Then somehow the idea of heart picks came to me. So I grabbed Jake's tub of foam hearts and a box of toothpicks and peeled and stuck (and peeled and stuck and....). That was clever of me so I took it up a notch and printed some little sayings in a cute font and cut them out. I used the 'frame' hearts with a large solid heart as the backing and liked that result too. So I'm going to give myself an A-...Jake played with the 'bad' first non-heart-shaped batch (a pirate ship full of cupcakes? ARGH!) and I frosted and stuck another 24 minis and even pulled off a few regular sized cupcakes with the remaining batter. Homemade frosting and heart thingies make up for the Betty Crocker made cake AND they were at least a pretty Valentines-y cherry chip!


Thursday, February 3, 2011
Booty Call!
Since all my blog posts at www.feltsilly.blogspot.com seem to start with some sort of acknowledgment of my, um, lack of consistency in posting, I'll skip that part here and just post.
Recently I treated myself to my first pair of nice dress boots. All my pals seem to have a pair so I decided I had to too. And 'treat' probably implies they were expensive but I got them for like 60% off the list price. So now as a new boot owner, I took notice of a cute idea from a craft blog for boot insert thingies - do they have an actual name? Ever willing to just forge ahead not sure what I'm doing with a craft or sewing project, I did. I got a cute flannel fabric remnant and winged it with that and supplies I have around the house. It took several tweaks on the first to get it right but that made the second one go lickety split. Now I have happy boots and another notch on my sewing belt!

Sad boots :-(

Happy boots! :-)

Jake calls them 'candy'.
Recently I treated myself to my first pair of nice dress boots. All my pals seem to have a pair so I decided I had to too. And 'treat' probably implies they were expensive but I got them for like 60% off the list price. So now as a new boot owner, I took notice of a cute idea from a craft blog for boot insert thingies - do they have an actual name? Ever willing to just forge ahead not sure what I'm doing with a craft or sewing project, I did. I got a cute flannel fabric remnant and winged it with that and supplies I have around the house. It took several tweaks on the first to get it right but that made the second one go lickety split. Now I have happy boots and another notch on my sewing belt!

Sad boots :-(

Happy boots! :-)

Jake calls them 'candy'.
Tuesday, May 25, 2010
Veggie Tales
We dabbled a bit in gardens the last year or two and did the tomatoes-in-pots a few times but this year we are trying a square foot garden. If you're not familiar with it check this out: www.squarefootgardening.com - it really sounds too good to be true! We also bought a farm share from www.redoakfarmsny.com and pick up our first set of farm-fresh organic vegetables tonight!
Jake was more interested in the planting tools...

and the hose

and the water

...but that allowed me to get the plants in their squares without interruption (other than the papparazzi)

Our bed is 4 X 4; in our 16 squares we have green beans (3), cherry tomatoes (2), 'regular' tomatoes (2), jalapeno peppers, banana peppers, green peppers, red peppers, cucumbers (2), watermelon (2). Our neighbor stopped by with an eggplant plant so that's going in the empty square.

I'll post a more recent picture later because the plants were a little droopy but have settled in nicely now! Yay for fresh veggies!
UPDATED PICTURE!
Check out how well everything is doing!

Jake was more interested in the planting tools...

and the hose

and the water

...but that allowed me to get the plants in their squares without interruption (other than the papparazzi)

Our bed is 4 X 4; in our 16 squares we have green beans (3), cherry tomatoes (2), 'regular' tomatoes (2), jalapeno peppers, banana peppers, green peppers, red peppers, cucumbers (2), watermelon (2). Our neighbor stopped by with an eggplant plant so that's going in the empty square.

I'll post a more recent picture later because the plants were a little droopy but have settled in nicely now! Yay for fresh veggies!
UPDATED PICTURE!
Check out how well everything is doing!

Friday, May 7, 2010
Don't You Just LOVE a Bargain?
Today by chance I saw a sign on the door of a Benjamin Moore paint store (on Rte 9 kind of across from A.C. Moore). I usually buy Behr paint at Home and Depot (as Jake calls it) but the sign said to ask about their 'mistake' paint that is $5 a gallon. So I did. They had three shelves in the back with gallons and quarts and glosses and flats and surprisingly... decent colors too! I found several variations of white and quite a few nice mossy or sage-y greens. Yah there were a few weird colors of yellow or pinkish, but most were seemingly usable 'normal' colors. I decided to go back with my hubby to see what gallons he might think we should get but I couldn't leave empty handed so I snagged a nice "Brandy Cream" quart of semi-gloss that will surely perk up trim around here somewhere. The friendly fellow behind the counter (who I didn't catch once making a face or rolling his eyes at Jake chattering and running around) put the can in the shaker for me and gave me a few stir sticks. AND he gave me a little "no charge ma'am" wave. Sweet! Now I'm DEFINITELY gonna go back.
Monday, April 26, 2010
Price Wars
A fellow blogger recently did a comparison test between local grocery store prices. She simply bought her usual stuff at each and compared the individual and total costs. Interesting, but my main market lost!? How can that be? I really pay a lot of attention to trying to save money and have long been convinced that Price Chopper is cheaper than Hannaford. Could I be (gasp) wrong? Pride aside I felt a call to action and went to Hannaford to do some price checking on my 'usual' items.
So how to go about my investigation? Compare regular price to regular price? Current price to current price? Ignore sale prices or use them? Oi! I started out by just cruising the Hannaford looking for what I thought were good deals (to make the trip worthwhile) and noting the prices of things I regularly buy. Some prices stood out as high, some low and they didn't carry some of my weekly needs; I buy organic milk for Jake and they didn't carry gallon jugs for example. So today I went to Price Chopper and did some more recon there. The more I tried to get a clear comparison the more muddled it became. Here's why...
Produce prices are always a moving target. Last week Hannaford avocados were $1.39 versus PC's for $1.00, but this week Hannaford has tomatoes on the vine for $1.99/lb and PC's are $2.99 (and last week Hannaford was charging $2.99! See?!) Ragu pasta sauce was $1.99 at Hannaford last week - it's $2.49 'regularly' at PC but on sale for $1.24 today. So if on a regular Wednesday (Prince spaghetti day!) I had a sauce emergency and could only choose between Hannaford and PC, I'd go to Hannaford for a 50 cents savings. HOWEVER, I look for deals like PC's $1.24/jar, add coupons and stock up on stuff like that. If I really did eat spaghetti on Wednesdays I'd be set for about a year with my current stash and pay about half of the regular Hannaford cost.
Are you brand loyal? If so you may pay more for the name if you don't shift your purchases to the currently lowest prices. Even with a coupon, the store brand is often cheaper than the name brand.
Another wrinkle: I also shop for certain things at WalMart. Unless there's a super-sale at PC that I know to be cheaper or I can't wait for a trip to WalMart I wait til my next trip to WalMart. For example Domino's Organic Sugar...Hannaford $2.69, PC $2.49 BUT WalMart $1.78. Yikes! Mount Olive Banana Peppers? Hannaford $2.37, PC $2.29 and WalMart $1.88. BUT PC sometimes has those for sale as BOGO so I can technically get them for $1.15 per jar. See how complex this all is?! Since I do follow the sales, check the fliers, and keep track of prices (yes I even have a dorky spreadsheet) I am quite confident I save money with my PC/WalMart strategy but I'm now more open to adding some Hannaford to the mix. They often have better produce, I like their hippy (natural foods) section, and they have TofuLin baked tofu that I heart (PC doesn't).
Here's an example (roughly) of regular PC to regular Hannaford:
Domino's Organic Sugar 2.49 2.69 1.78
Old El Paso Chilis 1.59 1.83
Swanson Veg Broth 1.29 .99
Ragu Pasta Sauce 2.49 1.99
Mt Olive Pepper Rings 2.29 2.37
Teddie Peanut Butter 2.89 2.89
Store brand mustard 1.49 1.29
Store brand milk gal. 2.57 3.39
Hood Cottage Cheese 2.49 2.49
Cabot cheese 8oz 2.89 2.29
Tofu 2.99 2.99
Goldfish 2.00 2.50
Melba Crackers 1.89 1.79
Store brand sandwich bags (50) 1.99 1.79
Store brand storage bags (50) 2.79 2.99
34.14 34.28
BUT....if I use my usual 'method' and buy PC sale/BOGO items (and assume no other price differences) I could have purchased the list above for about $30.60. Seems that most likely, on average, the higher and lower prices even themselves out over time if you don't do anything but get what you need each week. If, however, you check Price Chopper's flier and stock up on non-perishables and freeze freezables, buy produce at the store with the best prices for what you want each week, and use the cents off on gas you would definitely save a lot at Price Chopper. Add an occasional trip to WalMart for canned and jarred goods, tea/coffee, cereal and non-perishables would mean even more savings.
I've probably made this sound more complicated than it is for me. I've just learned what the things I regularly buy "could" cost and try not to pay more than that. I conclude that more than where you shop it's HOW you shop. Paying attention and stocking up are the saving keys.
So how to go about my investigation? Compare regular price to regular price? Current price to current price? Ignore sale prices or use them? Oi! I started out by just cruising the Hannaford looking for what I thought were good deals (to make the trip worthwhile) and noting the prices of things I regularly buy. Some prices stood out as high, some low and they didn't carry some of my weekly needs; I buy organic milk for Jake and they didn't carry gallon jugs for example. So today I went to Price Chopper and did some more recon there. The more I tried to get a clear comparison the more muddled it became. Here's why...
Produce prices are always a moving target. Last week Hannaford avocados were $1.39 versus PC's for $1.00, but this week Hannaford has tomatoes on the vine for $1.99/lb and PC's are $2.99 (and last week Hannaford was charging $2.99! See?!) Ragu pasta sauce was $1.99 at Hannaford last week - it's $2.49 'regularly' at PC but on sale for $1.24 today. So if on a regular Wednesday (Prince spaghetti day!) I had a sauce emergency and could only choose between Hannaford and PC, I'd go to Hannaford for a 50 cents savings. HOWEVER, I look for deals like PC's $1.24/jar, add coupons and stock up on stuff like that. If I really did eat spaghetti on Wednesdays I'd be set for about a year with my current stash and pay about half of the regular Hannaford cost.
Are you brand loyal? If so you may pay more for the name if you don't shift your purchases to the currently lowest prices. Even with a coupon, the store brand is often cheaper than the name brand.
Another wrinkle: I also shop for certain things at WalMart. Unless there's a super-sale at PC that I know to be cheaper or I can't wait for a trip to WalMart I wait til my next trip to WalMart. For example Domino's Organic Sugar...Hannaford $2.69, PC $2.49 BUT WalMart $1.78. Yikes! Mount Olive Banana Peppers? Hannaford $2.37, PC $2.29 and WalMart $1.88. BUT PC sometimes has those for sale as BOGO so I can technically get them for $1.15 per jar. See how complex this all is?! Since I do follow the sales, check the fliers, and keep track of prices (yes I even have a dorky spreadsheet) I am quite confident I save money with my PC/WalMart strategy but I'm now more open to adding some Hannaford to the mix. They often have better produce, I like their hippy (natural foods) section, and they have TofuLin baked tofu that I heart (PC doesn't).
Here's an example (roughly) of regular PC to regular Hannaford:
Domino's Organic Sugar 2.49 2.69 1.78
Old El Paso Chilis 1.59 1.83
Swanson Veg Broth 1.29 .99
Ragu Pasta Sauce 2.49 1.99
Mt Olive Pepper Rings 2.29 2.37
Teddie Peanut Butter 2.89 2.89
Store brand mustard 1.49 1.29
Store brand milk gal. 2.57 3.39
Hood Cottage Cheese 2.49 2.49
Cabot cheese 8oz 2.89 2.29
Tofu 2.99 2.99
Goldfish 2.00 2.50
Melba Crackers 1.89 1.79
Store brand sandwich bags (50) 1.99 1.79
Store brand storage bags (50) 2.79 2.99
34.14 34.28
BUT....if I use my usual 'method' and buy PC sale/BOGO items (and assume no other price differences) I could have purchased the list above for about $30.60. Seems that most likely, on average, the higher and lower prices even themselves out over time if you don't do anything but get what you need each week. If, however, you check Price Chopper's flier and stock up on non-perishables and freeze freezables, buy produce at the store with the best prices for what you want each week, and use the cents off on gas you would definitely save a lot at Price Chopper. Add an occasional trip to WalMart for canned and jarred goods, tea/coffee, cereal and non-perishables would mean even more savings.
I've probably made this sound more complicated than it is for me. I've just learned what the things I regularly buy "could" cost and try not to pay more than that. I conclude that more than where you shop it's HOW you shop. Paying attention and stocking up are the saving keys.
Tuesday, April 20, 2010
Tool Time
Well I got the laundry soap made but didn't get to the other two DIY projects because I started working on yet another new one! Yay for having more projects than there is time to do them! Anyhow, after seeing several home made kitchen sets online I decided darn it...I can do that and I will! I had a small 2-drawer dresser/end table in the basement that I thought would make a good stove/sink and when I went to size it up I found some old kitchen cabinets that, flipped on their side, would be a swell refrigerator. I was completely jazzed to jump in but of course my life no longer operates in such a whimsical way so I had to just dream for a while. In the mean time I did some more poking around the internet for ideas and got all sorts of inspiration.
This past Saturday I was zipping around the house cleaning everything in sight with my new Simple Green cleaner (love it!). When I hit the bathroom I suddenly decided it was the time to put on that final coat of paint and actually finish a (long over due) job. Happily I got it done and while I had extra paint and a wet brush and roller I thought "ding!" time to paint the "stove". So out I scurried to the garage and started slapping paint on the dresser. One coat was certainly not enough but I was happy to be beginning the project - a second coat on Sunday really helped and I may do one more for good measure. Sunday evening I went to Lowe's all by myself and had a great time walking the aisles looking for stuff I could repurpose into burners or knobs or doors or whatever! I found some 3 inch felt rounds that I think were supposed to be for furniture legs that I hope to use as burners and I scored a can of gray gloss spray paint that should be perfect for the stove interior - and half price $3 at that! I'm hoping to get a sink faucet of some sort online; I'm looking at RV size kitchen and bath stuff and think I can get something for under $20. I've been taking pictures and I'll track what I spend so I can put together a summary once it's all done. Yay for Mommy for jumping on a creative hunch and gettin 'er done!
This past Saturday I was zipping around the house cleaning everything in sight with my new Simple Green cleaner (love it!). When I hit the bathroom I suddenly decided it was the time to put on that final coat of paint and actually finish a (long over due) job. Happily I got it done and while I had extra paint and a wet brush and roller I thought "ding!" time to paint the "stove". So out I scurried to the garage and started slapping paint on the dresser. One coat was certainly not enough but I was happy to be beginning the project - a second coat on Sunday really helped and I may do one more for good measure. Sunday evening I went to Lowe's all by myself and had a great time walking the aisles looking for stuff I could repurpose into burners or knobs or doors or whatever! I found some 3 inch felt rounds that I think were supposed to be for furniture legs that I hope to use as burners and I scored a can of gray gloss spray paint that should be perfect for the stove interior - and half price $3 at that! I'm hoping to get a sink faucet of some sort online; I'm looking at RV size kitchen and bath stuff and think I can get something for under $20. I've been taking pictures and I'll track what I spend so I can put together a summary once it's all done. Yay for Mommy for jumping on a creative hunch and gettin 'er done!
Friday, April 16, 2010
I'm baaaaack!
We're back from our road trip and I'm back in the blogosphere! It seems somehow that the chaos of living in and out of a car for 10 days followed us home and I didn't feel 'settled' again until mid-week this week. So now what?! Well I'm nearly out of laundry soap so that's on the agenda for the weekend (yah, I live on the edge!) I've also looked into making dryer sheets or some sort of homemade version of dryer softening. Most of the information I found basically was a variation of using liquid fabric softener - on a washcloth or towel, dried or damp. Of course I need to use a coupon to buy the softener so I haven't bought my 'supplies' yet. Stay tuned for my results. And also on the DIY front, I found a fun blog tutorial for making freezer packs - you know the kind you pop in the lunch bag or cooler? I'll tackle that over the weekend as well and report back on what happens!
Wednesday, March 24, 2010
Another Spelling Bee Update
 Jake got Boggle Jr as a Christmas gift. I stashed it away for 'someday' and someday came this week! I assumed it was like the grown-up version (Boggle Sr.?) so I really hadn't imagined it would be of any interest to a 2 1/2 year old fella. Well, as it turns out it's pretty cool even at his age (and mine!) and is something he'll grow with as well. Basically, it's a set of cards with 3 or 4 letter words (no not THOSE 4 letter words), a set of letter dice and a tray with several ways to play. Simply looking at the cards and the words is a way to introduce a 'game'. The cards can be placed in the tray for the player(s) to find the corresponding letters and line them up with the letters on the picture, or the word on the picture can be hidden and the letter dice selected from memory. I also just lined up the dice with letters set to spell out familiar words (such as the names of our cats).
Jake's attention span for games is still a bit short (he asked for Chutes and Ladders today and sort of even played for longer than usual today so it's catching on!) but I really think this is a great way to combine learning and fun!
Tuesday, March 23, 2010
ABC's
Jake is AWESOME at his letters and singing the ABC Song. We started building an alphabet book together and it's coming along nicely. Each week (or every few days I guess really) we create a 12x12 scrapbook page with cut outs of the capital and lower case letter and various things that start with the letter. Our "A" page has an alligator and an apple and an ant and AbbyCaddaby for example. Yay for learning and yay for the Cricut cutting machine!
Friday, March 12, 2010
Quick Tip
Soap is soap. No, this isn't another soap making post...but it is soap related. Have you ever thought about soap? Of course not! But really, other than scent or bleach additives, how different is soap from soap? Not much. I found that cheap and/or unwanted shampoo works well all over the bathroom. I use a blob on the toilet brush or squirt some in the tub or sink and scrub it around. No yucky chemicals, smells nice, easy on the hands and kid/pet friendly for storage. I use the shampoo(s) I didn't like once I tried them or that were super cheap. I rarely buy anything but food at the grocery market, but when Price Chopper has a buy-one-get-one-free sale and I have a coupon I have scored shampoos for as little as 50 cents a bottle or even free! I bet you could even get some good "substitute" tub and bowl cleaner at a dollar store. Try it! You can always go back to your stinky, bleachy, toxic chemicals if you want to! :-)
Saturday, March 6, 2010
DYKWIK? (Do You Know What I Know?) Yoga Edition
Oh how I wish I could do yoga every day. OK, I suppose technically I could if I did my own sun salutations or made up my own routines but somehow that never seems to happen. So, alas, I schlep out to the gym to flop about on the dirty floor with a bunch of other people in a big usually cold room. It's really not that bad but it's a long way to Zen. Anyhow, I do bring my own mat because I am generally grossed out by other people and dirty floors and gym yuck and I also just happen to have one. Of course rolling your mat out on said dirty floor then rolls back onto itself when I leave so I am destined to collect dirt and gack anyhow. Recently my mat was shabby unchic with dust and road salt from the car and heaven knows what else and really needed a bath. But how to clean it? I looked it up on the trusty internets and found numerous people saying wash it in the washing machine. Could it be so easy?! Yes, but there's one catch I found (we'll get to that in a minute).
So I popped my mat into my machine with a little home-made laundry soap (see previous post!) and set it to cold and left the lid open so it wouldn't go to the spin cycle. Amazingly I remembered to go back and run it through a rinse cycle (again skip the spin cycle) and I remembered to go retrieve it after it was rinsed. It stayed in one piece and looked shiny and new! Yay! I hung it in the bathroom to dry. When it seemed dry-ish I draped it over a couple of laundry baskets to make sure it got enough air circulation. Seemed I'd found a quick way to clean when I assumed it would be a big hassle. Now...the catch. It takes a seriously long time to dry. Like a looooong time. In my case, longer than I allowed because when I proudly rolled out my fresh, sanitized mat on the dusty grubby floor and plunked down on it, my socks and yoga pants got wet. As class progressed I felt like I was going to slip as I squeezed out more water with every downward dog. I didn't really create a puddle or any danger to myself or those around me, but I now know I need to use a back-up mat until I'm really sure the washer-washed one isn't wet. Despite my learning curve, I'm happy with the results, a clean mat that even has a renewed 'stickiness' to it and a few fewer germs to boot!
So I popped my mat into my machine with a little home-made laundry soap (see previous post!) and set it to cold and left the lid open so it wouldn't go to the spin cycle. Amazingly I remembered to go back and run it through a rinse cycle (again skip the spin cycle) and I remembered to go retrieve it after it was rinsed. It stayed in one piece and looked shiny and new! Yay! I hung it in the bathroom to dry. When it seemed dry-ish I draped it over a couple of laundry baskets to make sure it got enough air circulation. Seemed I'd found a quick way to clean when I assumed it would be a big hassle. Now...the catch. It takes a seriously long time to dry. Like a looooong time. In my case, longer than I allowed because when I proudly rolled out my fresh, sanitized mat on the dusty grubby floor and plunked down on it, my socks and yoga pants got wet. As class progressed I felt like I was going to slip as I squeezed out more water with every downward dog. I didn't really create a puddle or any danger to myself or those around me, but I now know I need to use a back-up mat until I'm really sure the washer-washed one isn't wet. Despite my learning curve, I'm happy with the results, a clean mat that even has a renewed 'stickiness' to it and a few fewer germs to boot!
Thursday, March 4, 2010
DIY Laundry Soap ...Really!
I happened upon instructions for making your own laundry soap and I immediately was fascinated by the prospect. I'm always glad to use fewer chemicals around the house and HELLO - SAVE MONEY! Below are ingredients, instructions and my tips based on having made this a couple of times. It's really easy, quick and oddly fun.
First off - what you will need:

- Measure 4 cups of water into your saucepan and start heating to just below boiling.
- Grate the bar of soap. I used a regular cheese grater for my first batch. I used the grater attachment for the KitchenAid for my second batch. Hands down winner (pardon the pun) was the machine. You could use a food processor too. I used a full bar of Ivory and about 1/4 cup of FelsNaptha.
- Add the soap shreds to the heated water and stir occasionally until melted. Try to keep the mix from boiling. You'll end up with slightly sudsy, cloudy water.
- Pour your hot soap mix into the 5 gallon bucket and add 3 gallons of hot water. I just used hot tap water.
- Add in 1 cup of washing soda and stir for about 2 minutes or so. I used a big wooden paint stick but you could use a wooden yard stick or a long spoon or whatever you've got.
- Add 1/2 cup of Borax (if using) and stir again for about 2 minutes or so.
- If you want to add some essential oil for a bit of pretty scent, put in about 10-15 drops and stir up one last time. I made a plain batch the first time and added about 15 drops of Body Shoppe Lavender oil my second go around. My soap result was very lightly scented so I think you'd have to add a LOT to make overly scented soap. In other words don't worry about it being stinky.
Third off - what you will have:

- That's it basically! Put the bucket somewhere safe so kids, pets, or other critters can't mess with it. I put mine in the basement laundry area and used a large lobster pot lid to cover it. Let it sit overnight.
- When your new soap is thoroughly cooled it will look like whitish Jell-o. Give it a really good stir to break it up into a more pourable form. I stirred my second batch much better than the first and could easily funnel it into empty plastic milk jugs. I've also used empty laundry soap jugs. It works the same lumpy or smooth.
- When you're ready to use it just dump about 1 cup into the washer as usual and wash away. If you have a high efficiency washer I expect you'd use less but the 'gimmick' of HE laundry detergents is that they are low sudsing. This DIY stuff is already low suds so it should work a-ok in any kind of machine.
I was able to do 35 full size loads with the first batch so at less than $9 for supplies which would make at least 6 batches I calculate about 4 cents per wash. You can do 18 loads of laundry a month for under $10 a year! Tide and other commercial soaps cost between 22 and 25 cents per load so we're talking 80% off or more. This really is simple and doesn't take much time, and who wouldn't make time for a 80% off sale?!
Enjoy! Feel free to comment or email any questions and I'll try to help.
First off - what you will need:

- A 5 gallon bucket (I scored a perfect heavy duty one at Lowe's for $2.34)
- Sauce pan
- Hot water
- Washing soda (Arm&Hammer is the only brand I know. You can buy it at Price Chopper for about $2.99 for a 3lb 7 oz box and don't confuse it with BAKING soda they are different animals)
- A bar of soap (I used Ivory but Pure n Natural or something without additives would be fine. FelsNaptha is a laundry bar soap but I find it's too strong to use exclusively)
- Borax (I bought mine at Target for about $2.99 for a 4 lb box)
- Measure 4 cups of water into your saucepan and start heating to just below boiling.
- Grate the bar of soap. I used a regular cheese grater for my first batch. I used the grater attachment for the KitchenAid for my second batch. Hands down winner (pardon the pun) was the machine. You could use a food processor too. I used a full bar of Ivory and about 1/4 cup of FelsNaptha.
- Add the soap shreds to the heated water and stir occasionally until melted. Try to keep the mix from boiling. You'll end up with slightly sudsy, cloudy water.
- Pour your hot soap mix into the 5 gallon bucket and add 3 gallons of hot water. I just used hot tap water.
- Add in 1 cup of washing soda and stir for about 2 minutes or so. I used a big wooden paint stick but you could use a wooden yard stick or a long spoon or whatever you've got.
- Add 1/2 cup of Borax (if using) and stir again for about 2 minutes or so.
- If you want to add some essential oil for a bit of pretty scent, put in about 10-15 drops and stir up one last time. I made a plain batch the first time and added about 15 drops of Body Shoppe Lavender oil my second go around. My soap result was very lightly scented so I think you'd have to add a LOT to make overly scented soap. In other words don't worry about it being stinky.
Third off - what you will have:

- That's it basically! Put the bucket somewhere safe so kids, pets, or other critters can't mess with it. I put mine in the basement laundry area and used a large lobster pot lid to cover it. Let it sit overnight.
- When your new soap is thoroughly cooled it will look like whitish Jell-o. Give it a really good stir to break it up into a more pourable form. I stirred my second batch much better than the first and could easily funnel it into empty plastic milk jugs. I've also used empty laundry soap jugs. It works the same lumpy or smooth.
- When you're ready to use it just dump about 1 cup into the washer as usual and wash away. If you have a high efficiency washer I expect you'd use less but the 'gimmick' of HE laundry detergents is that they are low sudsing. This DIY stuff is already low suds so it should work a-ok in any kind of machine.
I was able to do 35 full size loads with the first batch so at less than $9 for supplies which would make at least 6 batches I calculate about 4 cents per wash. You can do 18 loads of laundry a month for under $10 a year! Tide and other commercial soaps cost between 22 and 25 cents per load so we're talking 80% off or more. This really is simple and doesn't take much time, and who wouldn't make time for a 80% off sale?!
Enjoy! Feel free to comment or email any questions and I'll try to help.
Saturday, February 27, 2010
Do You Know What I Know?
I'm a big fan of "helpful hints"...if they're actually helpful and actually work of course. When I do find a neat trick that, um, does the trick, I am always so pleased, but often wonder if maybe I was just the last to find out? Either way, whether it was my clever idea or someone else's clever idea that I finally got around to testing out, when it turns out great it's a Yay For Mommy! moment. Today's tip to pass along is a peanut butter solution. Now I have no idea where or when I heard this, but I recalled a tip that sticky, gooey, gummy sticker residue could be removed with peanut butter. I like to try to limit the use of chemicals where I can and heck, I have peanut butter around so I gave it a try.
My first attempt was that stubborn sticker backing and fuzz that I couldn't get off the dining room chair after Jake went through a sticker sticking spree. I rubbed on a dab of peanut butter and lo and behold it worked. No smelly chemicals and the peanut oil agreed with the furniture. DING!
Today I busted this trick out again for two things: to remove the sticky residue left from the band-aid Jake stuck to the hardwood floor (he often asks for a 'boo-boo sticker' to open and waste by sticking it anywhere but on himself) and to remove adhesive on a couple of plastic frosting tubs. I'd let the floor go an embarrassingly long time but a bit of the peanut butter rub and a few swipes of a sponge to clean up and floor done! The tubs took more work because they had more goo and I'd put them through the dishwasher. I thought the empty frosting containers would be handy for craft item storage or even for a project but they had an annoying stripe of label glue on each of them. It took more rubs but still only a few minutes and I had goo-free containers.
I only buy natural peanut butter so I suspect the slight 'grit' it has may help but as far as I know the tip is intended for any peanut butter (I'd skip chunky though). I've also heard peanut butter gets gum out of hair, but I hope I'll never have to test that one out!
Tuesday, February 23, 2010
More Fun Food Facts
I drink too much (tea) and there's nothing like a nice cuppa tea and a lovely slice (or 5) of toast. But I have another tea companion love: goldfish. Yes the crackers. No not the cheese or pretzel or rainbow. It began with cinnamon goldfish, the perfect match of crunchy little cookie-ish bite with another of my favorites - cinnamon. Then yesterday at Target when I was restocking my cinnamon snack fix (on sale for $1.66 a bag) I happened upon vanilla goldfish. Now I have tea time goodness times two! And while I won't try to suggest that they are a 'healthy' snack, you can eat 50 of the little buggers for 140 calories. That's about a half cup and if you eat them one or two at a time between tea sips they really last and feel like more than they are. And the best part of all? My 2 year old thinks "goldfish" are the orange cheese crackers so he stays away from Mommy's stash. Win-win!
Friday, February 19, 2010
Yum For Mommy!
I made a yummo quiche for a Mom's group meeting. A bunch of my friends are following Weight Watchers so I thought it would be nice to bring something that was already translated into "points". It really is good and doesn't taste at all diet-y. I intend to add it to the dinner rotation next week!
Weight Watchers Cheese and Broccoli Quiche
Ingredients:
Weight Watchers Cheese and Broccoli Quiche
Ingredients:
- 6 oz pie crust, 9-inch, refrigerated
- 2 tsp olive oil
- 1/2 cup red onions, chopped
- 1 1/4 cup part-skim ricotta cheese
- 1 cup low-fat shredded cheddar cheese
- 1 large egg
- 2 large egg white
- 1 tbsp Dijon mustard
- 1 tsp dried oregano
- 1 tbsp fresh chopped dill
- 1/2 tsp table salt, or more to taste
- 1/4 tsp black pepper, freshly ground, or more to taste
- 10 oz frozen chopped broccoli, thawed and well-drained
- 1 tbsp grated Parmesan cheese
TIP: Not a broccoli fan? Substitute spinach in its place.
Directions:
Preheat oven to 375ºF. Press pie crust into bottom and up sides of a 9-inch, removable-bottom tart pan or a 9-inch pie pan; refrigerate until ready to use.
To make filling, heat oil in a small skillet over medium heat. Add onion and sauté until soft, about 3 minutes. Transfer onion to a large bowl and add ricotta cheese, cheddar cheese, egg, egg whites, mustard, oregano, salt and pepper; mix well and fold in broccoli. Spoon mixture into prepared crust and level surface with a wooden spoon; sprinkle with Parmesan cheese and chopped dill.
Bake until a knife inserted near center comes out clean, about 35 to 40 minutes. Let stand 10 minutes before slicing into 8 pieces.
Entire recipe makes 8 servings
Serving size is 1 slice (1/8th of quiche)
Each serving = 5 Weight Watchers Points
Subscribe to:
Posts (Atom)